This is just a short little reminder, that the October Free Prints contest only has one week left. If you want to try and win a free print, all you need to do is comment on any of the facebook posts I've made in October. For each post you make a comment on, you'll get an entry to win a print.
Our facebook page is located at: http://www.facebook.com/anttree
While working on this weeks project, I had a sudden "gear change" (pun very much intended) after I saw some photos of Man Ray. He created a few photos of gears and clockwork items (quite a bit before "steampunk" was considered it's own art-form), using a method known as photogram. A photogram is, simply, a photograph created without a camera. Man Ray (and countless film students) placed objects directly onto unexposed photo paper and then exposed them to light. After exposing the paper, he would develop the paper (as you would normally do after exposing a negative onto photo paper) and create unique images. Man Ray used fruit, toys, trinkets, flowers, and more to create photograms, many of which would be impossible to create using "normal" photographic methods.
Originally I was going to try and take more macro photos of watch parts (ala Steampunk), using different methods than last week, but after seeing Man Ray's "pre-punk" work, I decided to do some digital photograms. Rather than using photographic paper, I decided to use my scanner bed as my medium. I placed the different parts directly onto the scanner bed and then covered them with different materials (to limit the light overflow and add contrast). I used black cloth and black cardstock as my blocking material, but I was pleased more with the cloth than the paper - the cloth had less light leakage and wrapped around the objects better.
This weeks change just reminded me that you never know when/where inspiration will come from, but when it does just grab on and go with it.
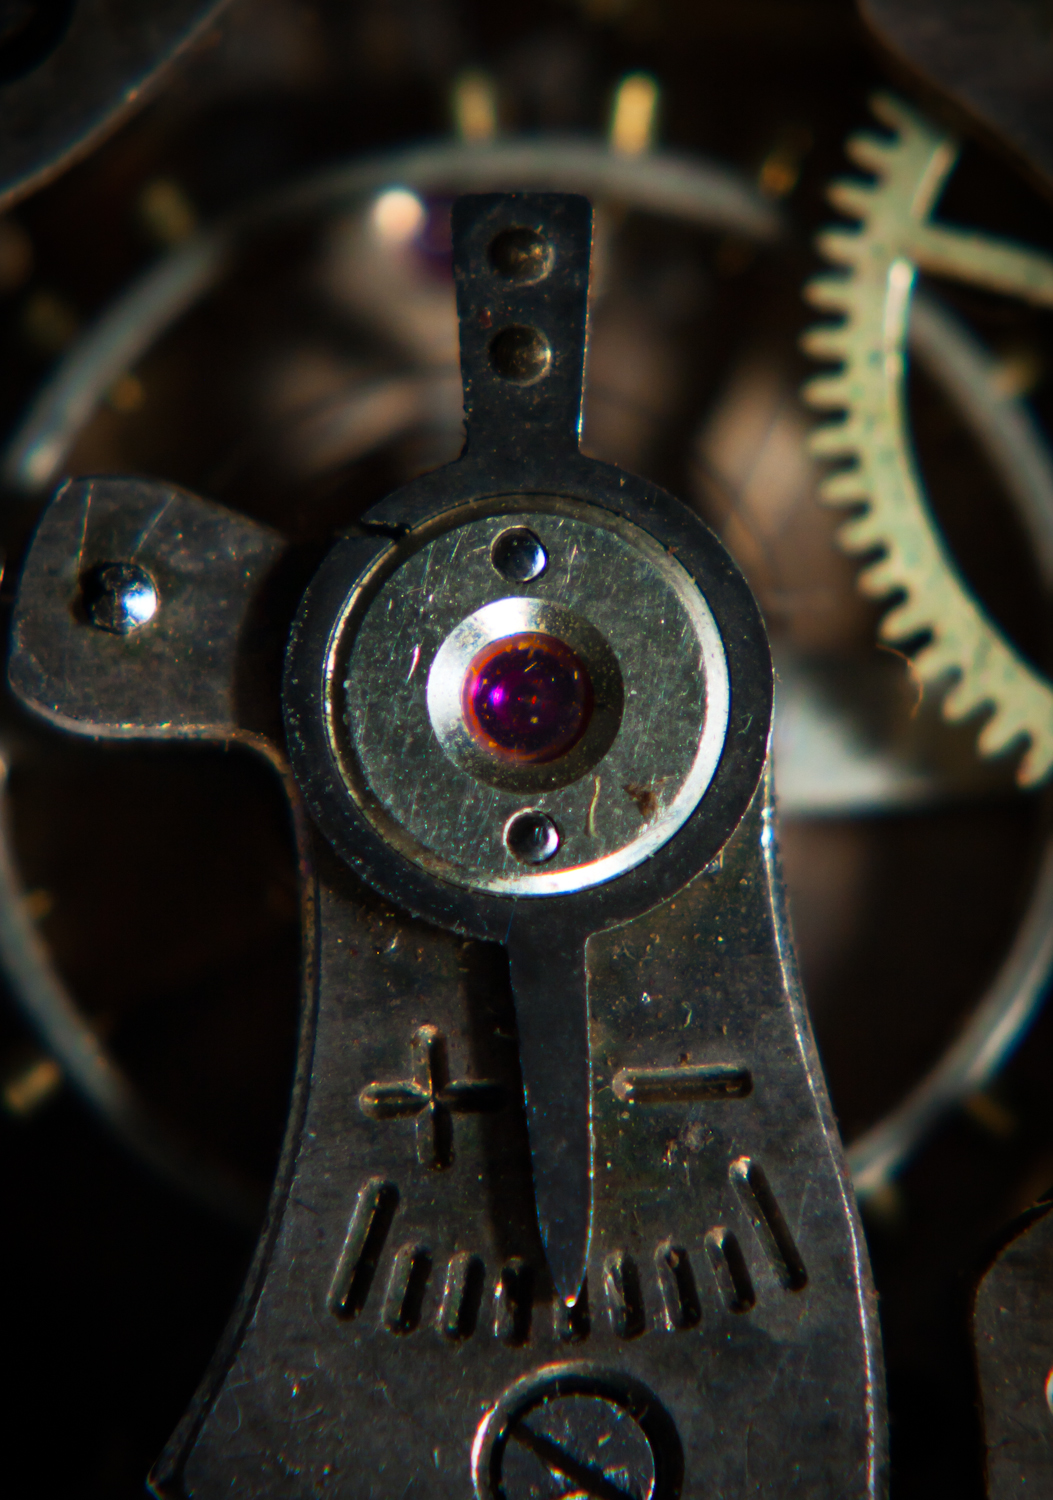
This week, I'm continuing with my "Steampunk" theme, but changing is slightly. Last week photos were macro/abstract shots of small pocket watches, in one piece. This week, I'm shooting even more abstract by only taking photos of the individual watch parts (cogs, gears, springs, etc). I'm not sure if having the parts in context of the watch will be better or worse than just having them separate.
One thing that makes this pictures so tricky, is the scale of how small these parts are (see photos). The whole watch is about the size of a quarter and there are 40-50 parts inside that watch! The gears and cogs are only about 5-8mm (some are as small as 2-3mm)! Because of how small they are, even using a macro lens (such as a 1:1 ratio) they don't appear that large. I've had to tinker together components to get a higher-powered macro. Last week I tried using a 2x and 4x ring filter adapter on my 100mm macro lens, and while they magnification was better, the photos were blurry and had a nearly non-existent depth of field. For this weeks project, I'm going to try a different method, using extension tubes rather than magnification filters.
Enjoy!
Ps: Here are some shots to show the scale of what I've been working with.
I've completed my first Steampunk themed week, and I have to say it was a lot harder than I thought it was going to be! Ultra-macro photos are very tricky to shoot, due to their extremely small focal point, but I think I got some nice photos. I tried a few different post-production techniques, including tinting, selective coloring and straight black and white conversion. One thing to remember when looking at these is the scale of the items. The watches that I used in this project are about the size of a quarter, and many of these shots are just of a few of the cogs/sprockets, which are very tiny! The purple items that you see are the timing crystals, which are about the same size as the head of a pin.
For this week (and perhaps next), I'm working on some Steampunk art pieces (Steampunk is a sci-fi genre based on extraordinary steam-powered devices, based during the Victorian times - Think Jules Verne or Will Smith movie, Wild, Wild West). I am working on two (although, I guess you could say three/four with fact I'm photographing all of it for my next for Project 50's) projects related to SP, the first is a Deco Book and the second is a mixed media piece (acrylic paint, metal, plastic and paper). To start both projects off, I needed to collect a lot of gears and cogs and the best place to do that is clocks!
I've been finding watches and clocks at all kinds of places and basically destroying reclaiming them for their parts. I decided some of the smaller watches would make for some great macro shots before they became "bits". So, for this week's project I'm showing the internal "bits" of some really old watches that I came across. One thing to remember when looking at the photos - most of these gears and cogs are 1/8th an inch or smaller. It's amazing how they made these devices (and also amazing how quickly I can now rip them apart!)
Last Friday I went to my very first WhiskyFest in San Francisco. I have to say, it was great fun, if you like whiskey! I, being the sick person that I am, enjoyed 46 tastings! Keep in mind, each tasting averaged between 1/4 ~ 3/4 an ounce (the later in the evening it got, the larger the tastings became!). I was, and I can say this with completely certainty, totally hammered by the end of the night. But it was totally worth it! I got to try so many new, and crazy-expensive, whiskeys - many of which I know I never would have tried by just buying random bottles at Bev-Mo. I also want to give a special "shout out" to my friends from St. George Distillery who where there and if you haven't given St. George Whiskey a try, you really should!
From a photographic aspect, I was pretty bummed out - they didn't really allow backpacks or briefcases and I didn't feel comfortable checking my camera bag, so I just decided to go 'sans-camera'. Probably for the best really - after 46 tastings I don't think I want any "unfortunate" evidence getting out from the event! So, with that in mind, I reset my "studio" from my last project and took some "shots" of whiskey-based subject matter.
This upcoming Friday (Oct 7th), is the 2011 WhiskeyFest, of which I shall be a proud participant! It is a chance to taste over 200+ whiskeys from all over the world, all within a 3-hour window! This will be my first "alcohol" based convention, and I am really looking forward to it (I figure, I've been to just about every other type of convention, I certainly can't say no to this one!). Unfortunately, they don't allow bags or backpacks, so I won't be able to bring my main camera, but I will bring my small point-and-shoot, because this much fun has to be documented! If you'd like more information on WhiskeyFest, please visit here.
As an extra special bonus, I'll be going with the other members of the Easy Bay Whiskey Club, on our first official outing!
For this weeks photos, well, they are going to be of whiskey! Bottles, glasses and shots!
Project 50 - Week 9
Concept: House Warming Bouquet
I have completed my first "studio lighting method" project and I have to say, I really enjoyed the results. In a nutshell, when taking photos, normally you have three main elements: the camera, the subject, and the lighting. Normally the lighting (and subject generally) is the static, non-changing, element and the camera is dynamic, constantly changing element. In a studio setting, these rolls are reversed, you set the camera to the settings you want and constantly change the lighting to make the best exposure. It's quite a different method of working, but I have to say a lot of fun! Now I understand why studio lights are so expensive - you can control their output (brightness) to an extreme degree. The flashes I was using went from "Full Power" to "1/128th" power (really low!)
Even if you don't have studio lights, next time you get the chance try and set your camera to Manuel and move the light sources back-and-forth to your subject to get the correct exposure.
Enjoy!
Bonus - Here is another version of the photo I posted yesterday, only this one is silver/gray tinted (rather than the brown/warm tint).
Project 50 - Week 9
Concept: House Warming Bouquet
A few weeks ago we had a lovely housewarming party and some of the guests brought flowers. Being that I'm an insane "take pictures of flowers!" kick, I thought I'd try and take some more macro photos of them. This time, I decided to try something totally different than the previous project. This time I wanted to completely control the environment so I setup a small studio in my office and tried to control all of the external factors (wind, lighting, background, etc). Normally I try and take pictures of plants and flowers in the natural habitat, but since these were already in a nice, easily mobile vase, I think it was fair.
For some technical bits (you can skip over this part if you don't really care how I setup this shoot):
I setup a table with a white paper background (changed to red and brown for a few of the shots). I used my 100mm macro lens set on Manuel with the setting of f/5.0 to f/6.3 and a speed of 1/60 to 1/80 (all at ISO 100). On camera I had a 580EX II flash and on a stand I was using a 430EX flash (as a fill light). I changed the power output of the flashes, rather than the aperture or shutter speed on the camera to fix any lighting issues. I'm told this is the method that portrait photographers use when taking studio shots - lock in the aperture and SS and let the flashes do all the work! I also used a direct connection from the camera to the laptop so I could see the photos better and see how the lighting was (rather than using the little 2" screen on the camera). This was a great technique and I would highly recommend, if you can use your computer as your camera's "LCD screen", do it!
Enjoy!
As a "teaser", here is a warm-tinted alternate version of a shot I'll be posting later. (remember, click on the picture to make it larger so you can see more of the details!)
Last month I mentioned an upcoming contest in which you
could win some of my free prints.Well,
without further ado (and we’ve had a whole lot of “ado” this last month), here
is the contest!
Every month I will be posting on my Facebook page (just
search for AntTree on Facebook and you will find it), including my weekly
project posts, other art projects I’m doing and sharing links to other sites
that I think you might find interesting.Every time that you comment on a post (regardless of the content you
post – just keep it “family friendly”), you get an entry into the contest.Commenting multiple times on the same post,
while appreciated, still only gets you one entry.
Example 1: I post 10 posts in October and you comment on
each of them once, you get 10 entries.
Example 2: I post 10 posts in October and you comment 15
times on each of the, you get 10 entries.
Once the month is over, I will randomly draw winners to
receive 1 (one) of the prints I make during the month.Each person can only win once per
drawing.I am planning on making 4-6
prints each month, chosen from my Project 50 photographs.If you win, I will require your name and
mailing address (PO Box is fine – I will be sending them via US Mail).Standard shipping to the US will be included,
but if you prefer any other shipping method (or live outside the US),
additional shipping fees will be required.
If you have any questions, please let me know and good luck!
Here are some of the flower photos that I shot while in Santa Cruz. All of these were taken with a 100mm macro lens, although many of the shots came out a bit blurry, that was more due to the wind blowing than the lens. Normally I take macro shots in a bit more of a controlled environment (see next week), due to the slightest movement can cause serious blur. Sometimes this motion can make for some really neat, unexpected blurring effects in your photos that you could have probably never replicate in a controlled environment. For example, photo #1 (blurred purple flower) I really like and I certainly feel I would have never gotten (or planned) for this photo in a studio.
Enjoy!
Bonus:
I liked the last photo as a black and white to highlight it's texture and feel (it was a white flower with little other color detail). Here is an alternate version of the red flower (photo #5) in black and white (with a slight silver/gray toning).
Just a quick aside, for those who know what's being going on - looks like things are calming down, everyone is home from the hospital and healing well and life is returning somewhat to normal now. For those who don't know, life has been tricky for the last month (it's a long story involving much time spent at hospitals and generally un-fun stuff). But, as mentioned above things are starting to calm down and I can once again dedicate a few brain cells to art and photography! Woo!
For this weeks project, I'm doing some photos of flowers I got while in Santa Cruz.
No specific reason on why I shot these photos, sometimes you just have to take pictures of flowers! It's just one of those "photo" things. That, and I like flowers.
As a bonus, here are two shots that I took with my 6mm fisheye lens. This is a tricky lens, only because everything on it is completely manual. Focus, depth of field, correct settings - these are all "good concepts" when using a fisheye, but not aspects that I have mastered yet!